
Creating a stunning ombre cake is easier than you think! It’s a showstopper dessert that looks incredibly professional, but with a little guidance, anyone can achieve this beautiful gradient effect. Whether you’re celebrating a birthday, wedding, or simply indulging in a sweet treat, learning How To Create The Perfect Ombre Cake will elevate your baking game to a whole new level. Imagine slicing into a cake that transitions seamlessly from a vibrant pink to a soft blush, or a deep blue to a tranquil sky blue. Intrigued? Let’s dive into the world of ombre cake magic!
Table Of Contents
Just like mastering the Best piping techniques for decorating cakes, creating an ombre cake is all about precision and a touch of artistry. This guide will walk you through every step, from preparing your batter to achieving that flawless color transition. We’ll cover everything from choosing the right food coloring to frosting techniques, ensuring your ombre cake is not only visually appealing but also tastes divine.
Understanding the Ombre Effect
The ombre effect, derived from the French word for “shaded,” involves a gradual blending of colors, creating a mesmerizing visual transition. In baking, this translates to a cake with layers of progressively lighter or darker shades of the same color, or even a transition between different colors. Think of it like a sunset, where the sky transforms from fiery orange to a soft pink, or a sunrise where the darkness gives way to the golden hues of dawn. That’s the magic we’re aiming for in our ombre cake.
Choosing Your Colors
The beauty of ombre lies in its versatility. You can use virtually any color scheme imaginable! From classic pastels to bold jewel tones, the possibilities are endless. For a romantic touch, consider shades of pink, lavender, or peach. For a vibrant celebration, try bright yellows, oranges, and reds. You could even go for a dramatic effect with deep purples, blues, and greens.
Preparing the Batter
Once you’ve chosen your colors, it’s time to prepare your batter. Start with your favorite vanilla or white cake recipe as a base. This provides a neutral canvas for your chosen colors to shine. Divide the batter equally into separate bowls, one for each shade you intend to create. This ensures an even distribution of color throughout your ombre masterpiece.
Achieving the Gradient
Now comes the exciting part: adding the color! Gel food coloring is your best friend here. It provides vibrant, concentrated color without altering the consistency of your batter. Add a small amount of coloring to each bowl, increasing the amount incrementally to achieve the desired gradient. Remember, start with less color than you think you need—you can always add more, but it’s difficult to take it away!
 Mixing Cake Batter for Ombre Effect
Baking and Layering
Bake each layer separately according to your recipe instructions. Once cooled, level the tops of each cake layer to create an even surface for stacking. This is a crucial step for a stable and visually appealing ombre cake. Now, stack the layers, starting with the darkest shade at the bottom and gradually working your way to the lightest shade at the top. This creates the seamless transition that defines the ombre effect.
Frosting Your Ombre Cake
Frosting can further enhance the ombre effect. You can either create a monochromatic frosting that matches the cake’s color scheme or opt for a contrasting color that makes the cake layers pop. Similar to Best cake decoration techniques, the frosting application requires a gentle touch. For a smooth, seamless finish, use a crumb coat first to trap any loose crumbs, then apply your final layer of frosting.
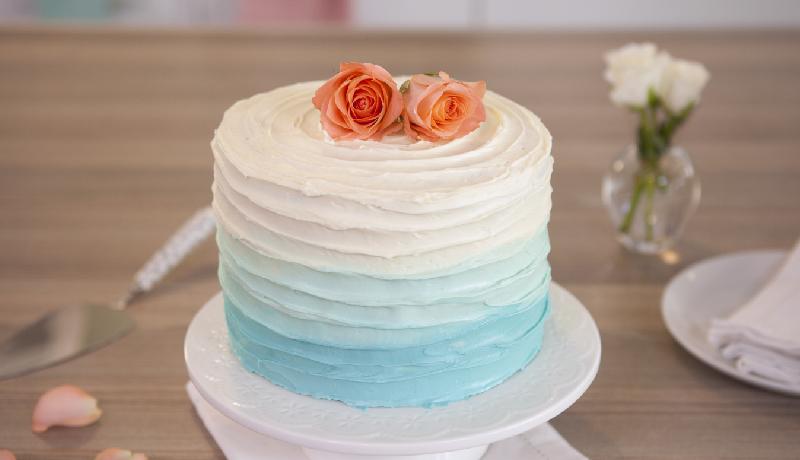 Frosting an Ombre Cake
Tips for a Flawless Ombre Cake
- Use high-quality gel food coloring for vibrant, true-to-color shades.
- Start with a small amount of coloring and gradually increase the intensity.
- Level your cake layers for even stacking and a professional finish.
- A crumb coat is your secret weapon for a smooth, flawless frosting application.
Troubleshooting Common Issues
Sometimes, despite our best efforts, things don’t always go as planned. If your colors bleed into each other during baking, it could be due to overfilling the pans or uneven oven temperature. Ensure your pans are filled no more than two-thirds full and your oven is properly calibrated for consistent results. Don’t worry, practice makes perfect! Every baking experience is a learning opportunity.
Beyond the Basics: Creative Ombre Variations
Once you’ve mastered the classic ombre technique, feel free to experiment with different variations. Try a reverse ombre, starting with the lightest shade at the bottom and progressing to the darkest at the top. Or, explore a horizontal ombre effect within each layer, creating a stunning swirl of colors. You could even incorporate different flavors into each layer to complement the color gradient.
 Creative Ombre Cake Variations
Taking Your Ombre Cake to the Next Level
For those feeling extra adventurous, consider incorporating other decorating techniques, like piping intricate designs or adding edible flowers, to elevate your ombre cake. Looking for piping inspiration? Check out our guide on how to pipe cupcake frosting. Remember, the only limit is your imagination!
 Decorated Ombre Cake
Conclusion
Creating the perfect ombre cake is a rewarding experience that combines creativity and precision. With the right techniques and a touch of patience, you can achieve a stunning dessert that will impress your friends and family. So gather your ingredients, choose your colors, and embark on your ombre cake adventure! Remember to share your creations and tag us—we can’t wait to see what you bake!